My first pair of antlers for Frill
Now, it's no secret I am not the craftiest person in existence, beyond a back stitch and a glue gun and you've lost me. But clay is something I certainly have in my crafting pool and I set out at the beginning of the summer to make a mori-esque outfit for Frill and since I still wasn't over the deer fur trend I decided I was going to do a deer themed coordinate. This post is about how to do a part of that after quite a few requests: Deer antlers!
Now, this tutorial is very easy and very adaptable. You can change, mess around with, and embellish as you see fit!
You will need:
- A cup of water (you don't need a huge amount)
- Paper Clay in a natural white color
- Wire
- something you'll be attaching the antlers to like a headband or a garland like above (If using a headband I suggest something stiffer than what I use, like metal)
- Any lace, paint, chalk pastels or other accenting stuff
Roll out the larger one into a thin-ish roll a little bigger than your middle finger. At about 16 cm it's long enough, you can make it a little longer and thinner or shorter and thicker but consider that it's going to weigh when you attach it to the headband.
Decide which end is the outward end and taper it a bit into a pointy tip.
At this point you may notice some ugly dents, nicks, or empty spaces like below. Get rid of these by wetting the clay with the water you have and rubbing relatively lightly but quickly over the area until it's smooth and uniform.
It should look like this now: Twist it so that the top 2/3's is curved in an arch afterwards.
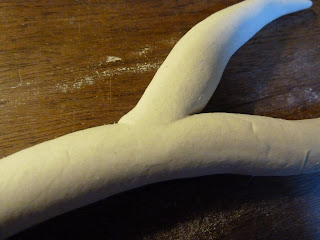
Now take that smaller piece of clay and do a much stubbier version of what you did before. It should be around 1/3 the length of the other piece and have a much sharper tapering.
Now take the flat bottom part and with something stiff and smallish like a tooth pick or a piece of wire rough up it up. Then dampen it with your finger and some water. Go back over it to rough it up again if necessary.
Curve it so that it arches vaguely too.
Dampen your finger and rub the two parts together pushing them together with your nail and then smoothing it out as necessary
Now take a small amount of clay (very small) and get it really mushy and wet. It should be paste like.
Put it on over the seam where you attached the two parts and rub it in so it blends into the rest of the clay and up into the crevice at the top. Make sure it's covered all the way around. You'll need to do it again with the other side and some more clay to make sure it has full coverage.
Curve both pieces of the antler the same direction, facing inwards.
Cut out the bottom at an angle (try and lose as little height as possible) that is also facing inwards. This will make it easier to mount the antlers.
Repeat this inverted and you have your two antlers.
Wait a few days until they are COMPLETELY dry. 3 days is a safe bet.
~~~~~~Three days later~~~~
Take one of your antlers and the thing you wish to attach it to and a good length of wire. wrap the middle of the wire around the bottom of the antler. Position the antler to where it should sit on the headband and wrap the wire around the base.
Repeat on the other side
Now you'll either want to leave the wire as is, which is cool, or you'll want to cover it up. You can do this with ribbon, leaves, lace, etc. If you're using a laurel then the leaves should naturally cover it up. I used ribbon for this pair.
The end! Good luck with your endeavors!


Very cool! I always wanted to make something like this!
ReplyDeleteHi... i want ask you....
ReplyDeleteWhat should we do for process of dry? let it in the sun or just keep them in our room?
They should dry just by air contact, so leaving them in a safe place in your room so long as it isnt terribly humid is fine!
DeleteOMG i let them close to the window T__T i hope they not melted away :(...
DeleteThank you for shared anyway <3
Oh its nothing to worry about, They should be fine anyways.
DeleteThis comment has been removed by a blog administrator.
ReplyDeleteThis comment has been removed by a blog administrator.
ReplyDeleteThis comment has been removed by a blog administrator.
ReplyDeleteThis comment has been removed by a blog administrator.
ReplyDeleteThis comment has been removed by a blog administrator.
ReplyDeleteThis comment has been removed by a blog administrator.
ReplyDeleteThis comment has been removed by a blog administrator.
ReplyDeleteThis comment has been removed by a blog administrator.
ReplyDeleteThis comment has been removed by a blog administrator.
ReplyDeleteThis comment has been removed by a blog administrator.
ReplyDeleteThis comment has been removed by a blog administrator.
ReplyDeleteThis comment has been removed by a blog administrator.
ReplyDeleteThis comment has been removed by a blog administrator.
ReplyDeleteThis comment has been removed by a blog administrator.
ReplyDeleteThis comment has been removed by a blog administrator.
ReplyDeleteThis comment has been removed by a blog administrator.
ReplyDeleteThis comment has been removed by a blog administrator.
ReplyDeleteThis comment has been removed by a blog administrator.
ReplyDelete